
Lost Faces: What it takes to restore a photo without rewriting it
AI played a role in this restoration—but it wasn’t the driver. What follows is a look at the decisions, pauses, and corrections that mattered most while bringing lost facial detail back without erasing the photo’s history.

Before I touched a single tool, I had to define what I really needed to achieve.
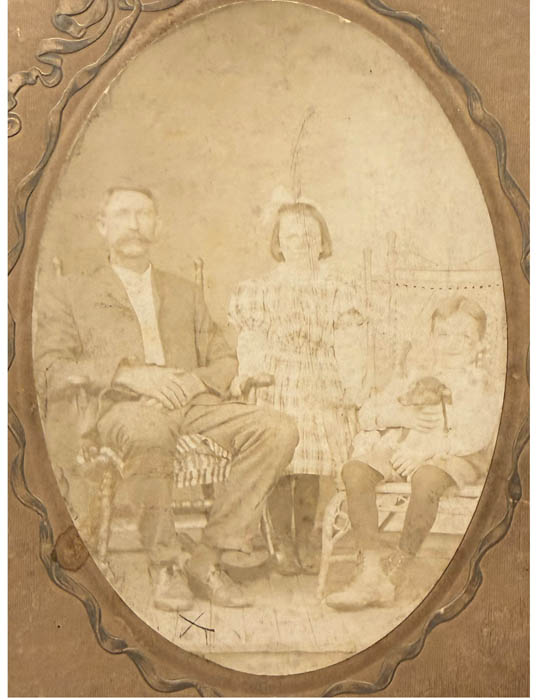
This photo wasn’t sitting loose in an album. It was sealed inside an oval paper frame—one of those old mats that lookssimple until you realize it can’t be opened without risking the photo, the frame, or both. So I couldn’t scan it flat, clean it safely, or even check the edges without making a choice that might permanently damage what I was trying to preserve.
And then there was the bigger issue: the faces.
You can still read the father pretty clearly. But the daughter and son? Their facial detail had faded to the point where they were almost gone—more suggestion than person. The daughter’s face also had visible wear (either surface damage or a physical crease), which meant any “restoration” would have to be careful not to turn a real mark from time into something artificial.
So the goal became very specific:
-
bring the kids back without inventing them
-
keep the feel of the original photo (it’s allowed to look old)
-
convert the oval presentation into a rectangular image that can be framed today
-
recover as much real detail as possible before attempting any reconstruction


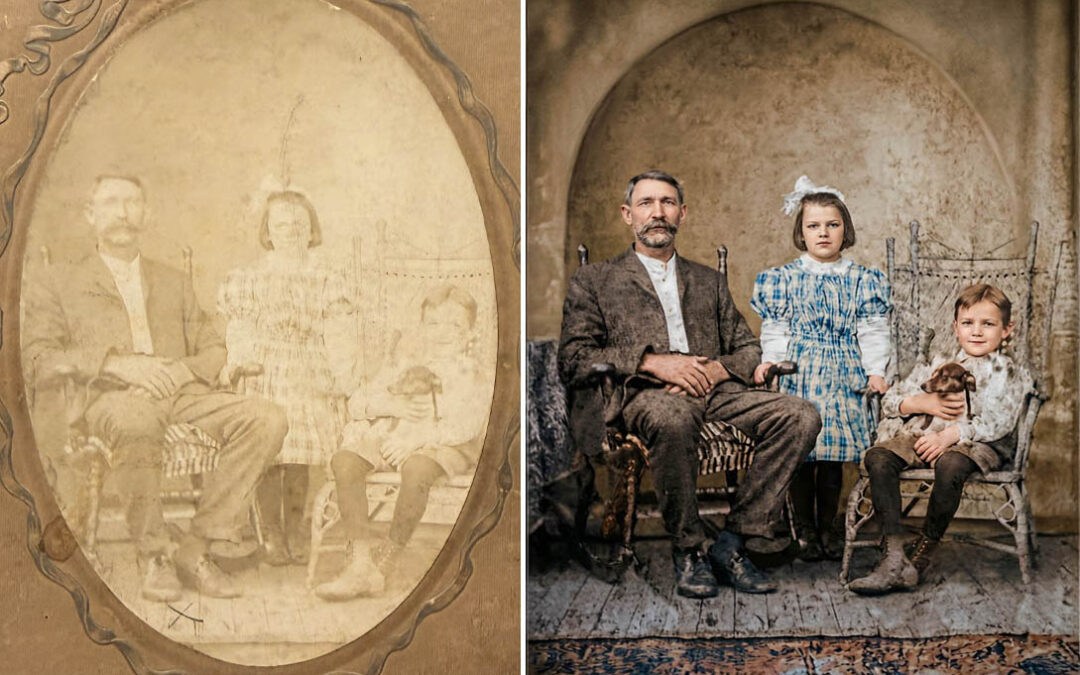
Here's the original image – extreme fading with some damage and wear in a paper oval frame
Using photoshop I added two layers to use color correction and blending modes to boost the contrast and bring back details.
Stage 1: Finding the details
My first move is always preparing the file with the work horse that is Photoshop.
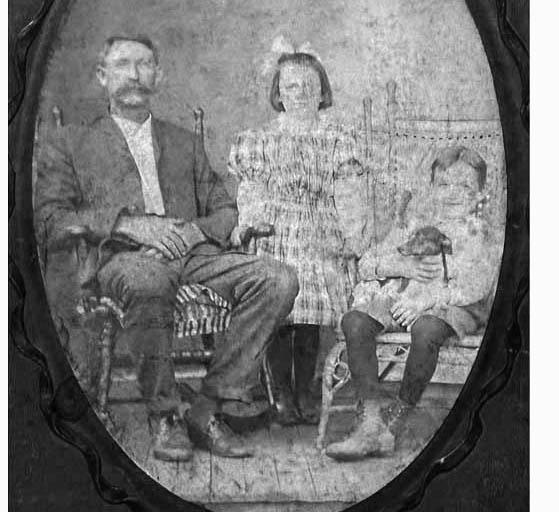
Before any AI entered the conversation, I needed to know whether the information was still hiding in the file—or truly missing. I used basic color correction and a few blending mode tricks to darken the image and increase contrast. The goal wasn’t to make it look good. It was to see.
Think of it like turning a flashlight at a shallow angle across a faded print: you’re not fixing anything yet—you’re just trying to reveal what your eyes can’t pick up at first glance.
That first pass told me two things right away:
- there was more facial structure buried in the fade than it initially seemed, and
- it would be really easy to push too far and end up with something heavy, muddy, and overworked.
That’s the first slider above — my “visibility pass.” Not a finished step, but an essential one.
Stage 2: Simplifying Before Restoring
Before bringing AI into the process, I needed to simplify the image and clean anything I could handle responsibly on my own.
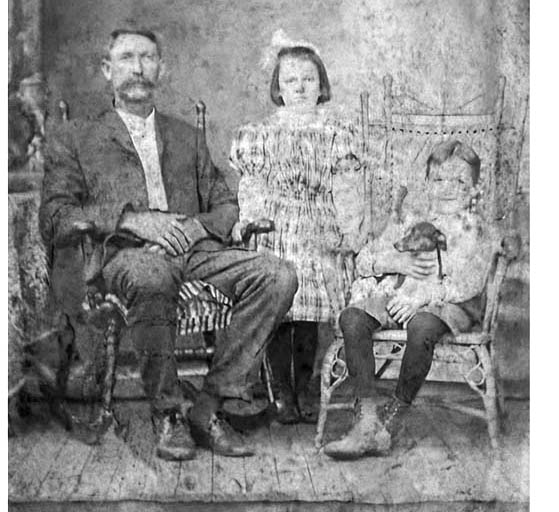
The first thing I did was remove the sepia tone. Not because it was wrong or unattractive, but because color can hide problems. Stripping it back made damage, wear, and tonal inconsistencies easier to see and evaluate.
From there, I stayed entirely in Photoshop. Using basic healing and cleanup tools, I addressed issues I knew I could fix without guessing: light wear on the daughter’s face, small surface marks, the distracting “X” on the floor, and a handful of other imperfections. This kind of manual cleanup is slow and deliberate, but it’s important. Anything that can be repaired without inventing detail should be handled here first.
The slider below shows this simplified, cleaned version. It’s not meant to look finished—it’s meant to remove distractions and set a stable foundation for what comes next.

Stage 3: Conservative Restoration (Respect First)
This is where AI tools entered the process—but carefully.
I wrote a long, specific prompt asking for historical accuracy, gentle cleanup, and help removing the oval paper frame so the image could exist as a rectangular photograph suitable for framing today. The goal wasn’t clarity or color—it was readability and preservation.
You can see the AI beginning to clarify details and fill missing areas. The father’s rocking chair becomes more defined. To his left, a new element appears: a table with a cloth draped over it. That table wasn’t present in the original—but once the oval frame was removed, new space had to be created somewhere. This is the first real decision point: accept a plausible addition, or rethink the structure entirely.
There’s another subtle change as well. The AI imagines an oval-shaped inset in the wall—essentially preserving the memory of the original frame. That’s thoughtful, but it’s also an interpretation. Oval inset or full wall? Neither is “correct,” but each choice affects how the image reads.
And then there’s the biggest warning sign. The image is now slightly stretched vertically.
This is something I watch closely. AI restoration tools often introduce tiny perspective shifts with each pass—small enough to miss at first, but noticeable over time. Faces elongate. Furniture creeps. The image slowly drifts away from its original geometry.
At this stage, nothing is final. This pass isn’t about getting it right—it’s about seeing what’s possible, identifying risks early, and knowing exactly what will need to be corrected before moving forward.


Final Pass: Color, Corrections, and Knowing When to Stop
The next two sliders show the final turning point in this restoration.
The first is an AI-assisted colorization pass. At this stage, color wasn’t about making the photo feel modern—it was about adding depth and separation while staying muted and believable. Early color photography and hand-tinted prints were the reference, not today’s cameras.
The second slider shows the corrected version after I addressed one of the biggest issues introduced along the way: vertical stretch and proportion drift. This is where everything came back into Photoshop. I aligned the restored image directly over the original, adjusted scale and perspective by hand, and made sure faces, furniture, and the room itself lined up where they should. It’s quiet work—but essential.
The Final Result
This was a tough restoration. The fading, the damaged areas, and the missing facial detail made it a careful balance between recovery and restraint. In the end, I was happy with the result because it stayed true to the tone and feeling of the original photograph without pretending to be something it wasn’t.
Just as important, this was a collaborative process. I worked closely with the client to make sure these three long-lost relatives didn’t just look right—but felt right. That part matters as much as any tool involved.